
GPX Generator: Saving, sharing and downloading
Saving a route
When the route goes the way you want, press
 Save Route:
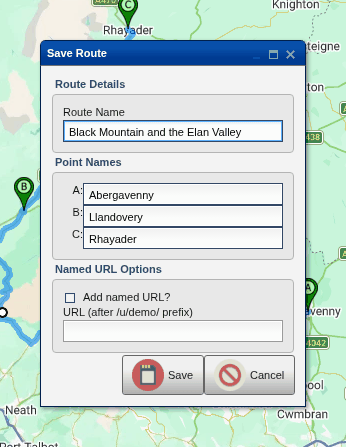
- Route Name: what you'll see in your list of saved routes (and what your sat nav will call the route).
- Point Names: a name for each stop (A, B, C...). These go into the GPX file too, so they're worth filling in.
- Add named URL?: as well as the address every saved route gets, give
it one that's easy to remember and share, such as
https://gpx.cgtk.co.uk/u/demo/black-mountain. For this, you first need to choose a user name, in your preferences. Each named address can only be used once: for a new version of the route, use a new name (black-mountain-v2, say).
Press Save. The page's address changes to the saved route's address
(something like https://gpx.cgtk.co.uk/v2/SRWF8): bookmark it, or send it
to someone, to come back to the route. (Anyone you send it to needs to sign
in to see it.)
Saving makes a new copy of the route each time, with its own address, so saving a changed route doesn't change the one you saved before. Any change to the route (even renaming a stop) means it needs saving again before you can download it.
Your saved routes
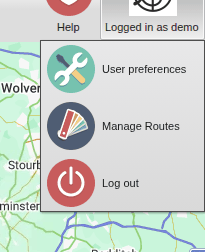
Click Logged in as ... in the top right-hand corner, then
 Manage Routes:
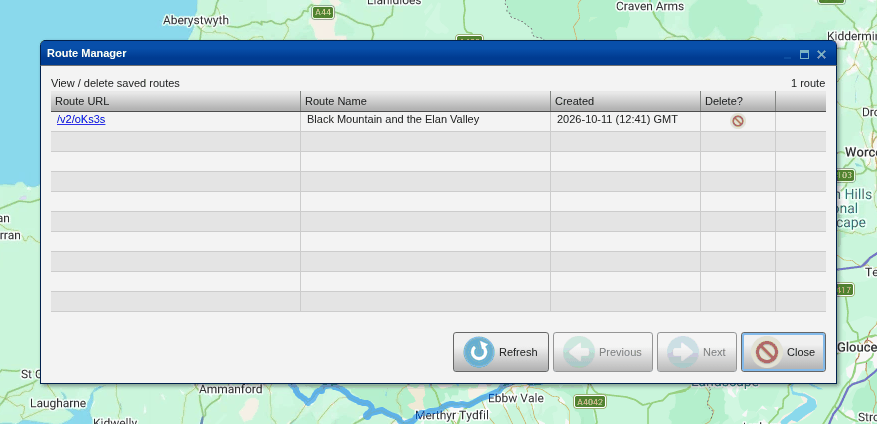
Click a route's address to open it (or middle-click it to open it in a new
tab), and the red symbol in the Delete? column to delete it. The newest routes are
at the top; use Previous and Next to page through the rest, and
 Refresh if you've saved routes in
another window since this one was opened.
Route Info
 Route Info shows each stop and
the leg after it: its distance (in miles and kilometres) and roughly how
long it takes. The totals are at the bottom.
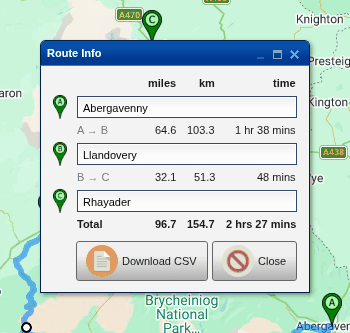
You can rename the stops here too: click a name, type, and press Enter. Leave a name empty to go back to "Point A" and so on.
The window keeps up with the route while it's open, so you can leave it open while you tweak the route and watch the distances and times change.
 Download CSV
downloads the same information as a spreadsheet: for each leg, its stops'
letters and names, the distance in miles and kilometres, the time (in
seconds, in hours, and written out) and the average speed in mph and km/h.
Downloading the route
Once the route is saved, press
 Download GPX and choose a
format. The formats are in groups:
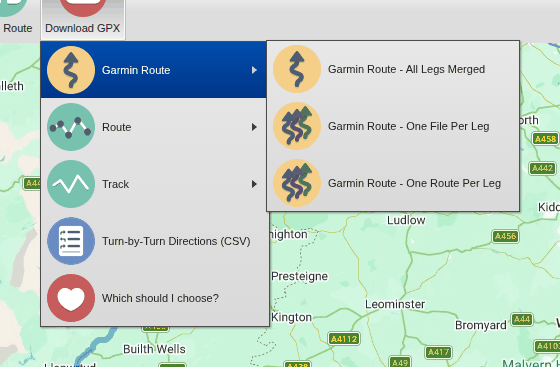
| Format | What it is |
|---|---|
 Garmin Route - All Legs Merged |
For Garmin sat navs: a route with your stops and, between them, the road exactly as you planned it (as Garmin "shaping points"). |
 Garmin Route - One File Per Leg |
The same, but one file for each leg, all in a zip file: for older Garmins that cope badly with long routes. |
| Garmin Route - One Route Per Leg |
One file, with each leg as a separate route. |
 Route |
A plain GPX route: just your stops and control points. Almost any sat nav or app can load it, but it works out its own route between the points, which may not be the one you planned. |
 Route - One Route Per Leg |
The same, with each leg as a separate route. |
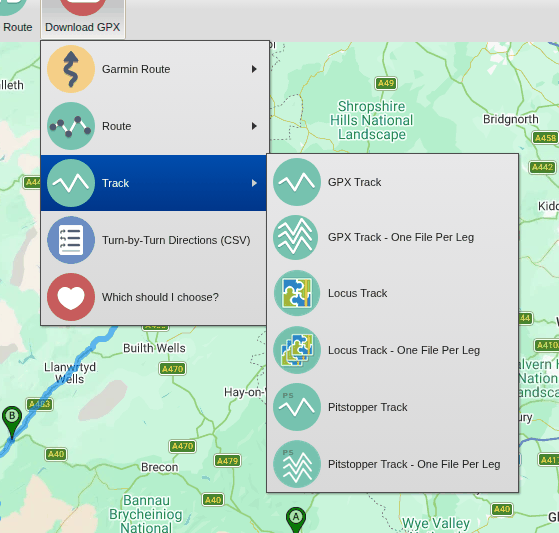
 GPX Track |
The line of the route, in detail, exactly as planned, with your stops as waypoints. Most sat navs and phone apps can follow a track. |
 GPX Track - One File Per Leg |
One track for each leg, in a zip file. |
 Locus Track |
A track with turn-by-turn instructions, in the form Locus Map's own route planner writes them, so Locus can give spoken directions as it follows your route. (Also as One File Per Leg.) |
 Pitstopper Track |
A track with turn-by-turn instructions in the form PitStopper writes them, which some other apps can navigate. (Also as One File Per Leg.) |
 Turn-by-Turn Directions (CSV) |
Not a GPX file: the turn-by-turn directions as a spreadsheet, one row for each instruction (and the start and each stop), with distances, road names and positions. Handy for printing a route card. |
The per-leg formats only appear when the route has more than one leg.
Which format should I choose?
(Which should I choose? at the bottom of the menu opens this guide.)
- A Garmin motorcycle (or car) sat nav, such as a Zumo: Garmin Route - All Legs Merged. If your sat nav struggles with routes with several legs (older models such as the Zumo 660 do), try One File Per Leg instead. If you have a Zumo 660, update it to a recent version of its software (3.80 or later) first.
- Locus Map (on Android): Locus Track or the simple GPX Track.
- Another phone app: GPX Track, or Pitstopper Track if the app can give directions from one.
- Another sat nav: try GPX Track first, as it describes the route exactly. If your sat nav can't follow tracks, use Route, but check the route it works out between your points.
- A route with off-road legs: see Routes with off-road legs, below.
Sat nav recalculation - IMPORTANT
Most sat navs are set to work out a new route automatically if you leave the planned one, for example if you take a wrong turn or cut a corner, or if their map is slightly different from the one you planned on. That throws away all your careful planning. Disable recalculation to make sure that your route is preserved.
On a Garmin, set Recalculation Mode (in Tools > Settings > Navigation) to Prompted or Off. It's also worth turning off Traffic, as traffic information can make it recalculate too. (The site reminds you of this when you download a Garmin format.)
Routes with off-road legs
A sat nav won't navigate an off-road leg the way you drew it: given the points, it works out its own way between them along the roads it knows (if it can find one at all). So for most sat navs and apps, download a track (GPX Track, Locus Track or Pitstopper Track): the sat nav then shows the line you drew, on- and off-road, and you follow it.
On a Garmin Zumo, you can have the best of both. My Zumo 595 will read a Garmin Route that contains a mixture of off-road and on-road legs, but it won't navigate along the off-road sections. It'll take you all the way to the start of the off-road section and show that point as the end of the ride. When you've finished the off-road section you can restart navigation (and choose the end of the next on-road section as the next stop) and carry on with navigation on the roads. For the off-road sections you're on your own. When I'm doing a mixed on- and off-road ride, I'll usually get the GPX Track format and the Garmin Route - All Legs Merged format and put them both on the Zumo. I'll set it up to display the GPX Track and navigate along the Garmin Route. Then when I get to an off-road section I can see the route on the screen and follow it manually. When I'm back on the road again, I'll get it to navigate again.
Opening a GPX file
 Open GPX opens a GPX file from your
computer or phone:
- A route in the file is loaded onto the map for you to carry on editing (and then save as one of your own routes). A file with several routes that follow on from one another (as Route - One Route Per Leg writes them) is loaded as one route.
- Tracks are drawn on the map in purple, for reference: a ride a friend sent you, say, or a record of a ride you've done. Right-click (or long-press) on a track for its menu, which has Remove This Track (and, with a route on the map, the map's own menu items too).
A track isn't a route, so it can't be edited, but you can plan a route along it.
This website is free and ad-free, but costs me money to run. If you'd like to support this site, please consider making a small donation or sending me a message to let me know what you liked or found useful.