Heat Treatment Oven Build Process
Page 4 of 35
Posted 25th October 2024
I haven't done much more thinking about the heat treatment oven over the last few months (life went a bit sideways as a result of my other half having a bad car accident), but the weather is starting to cool down and that makes the idea of this project a bit more appealing. I'd like to get this built over the winter so I need to make some more progress with the design.
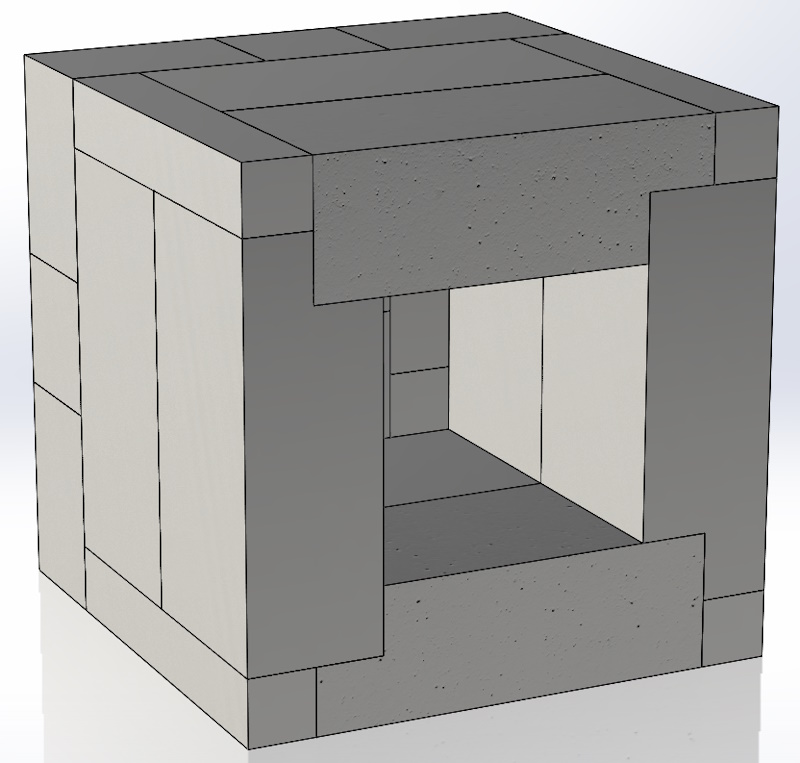
The highest priority outstanding design question was the layout of bricks. I had some feedback on my first design that highlighted the unsupported bricks at the top of the cavity. Removing that issue while keeping roughly the same cavity size (to suit the intended use) and wall thickness (to keep the overall weight down) meant that I had to design it to have a lot more cut bricks. I've never handled insulating fire bricks before but from what I've read / watched it seems that they're relatively easy to cut so hopefully the large number of cut bricks won't cause too much of an issue.
This is the new layout of the body (which should weigh about 14 kg before all the metalwork and insulating wool is wrapped around it):
The middle "slice" is a mirror of the front slice (i.e. the notch in the top brick is on the left rather than the right). In an ideal world, those four corner pieces will all come out of a single brick, but I plan to order quite a few spares in case of problems.
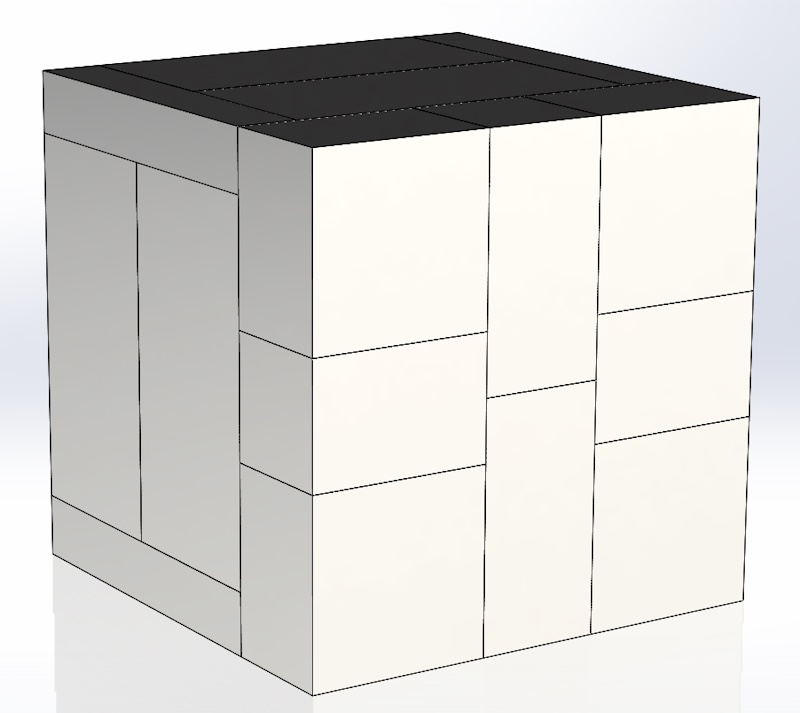
This is the layout of the back (which will also match the door):
If my maths is right (and there's minimal wastage) I think I can make the structure (including door) out of 19 bricks. At £2.76 each that works out as £52.44 for the bricks. In practice I'll order quite a few spares so it'll end up more expensive than that (but then I'll have allowance for breakage and/or non-optimal use of bricks). I'll also need to buy the ceramic fibre blanket to go around the outside, some fireproof rope for the door seal and some sort of mortar (perhaps this stuff or this stuff - I need to do more research here) to stick the bricks together. I think that'll be everything from Vitcas but there are lots and lots of other bits needed from other suppliers. I'll probably order the Vitcas stuff fairly soon as it's often helpful when designing things to have some of the materials to hand.
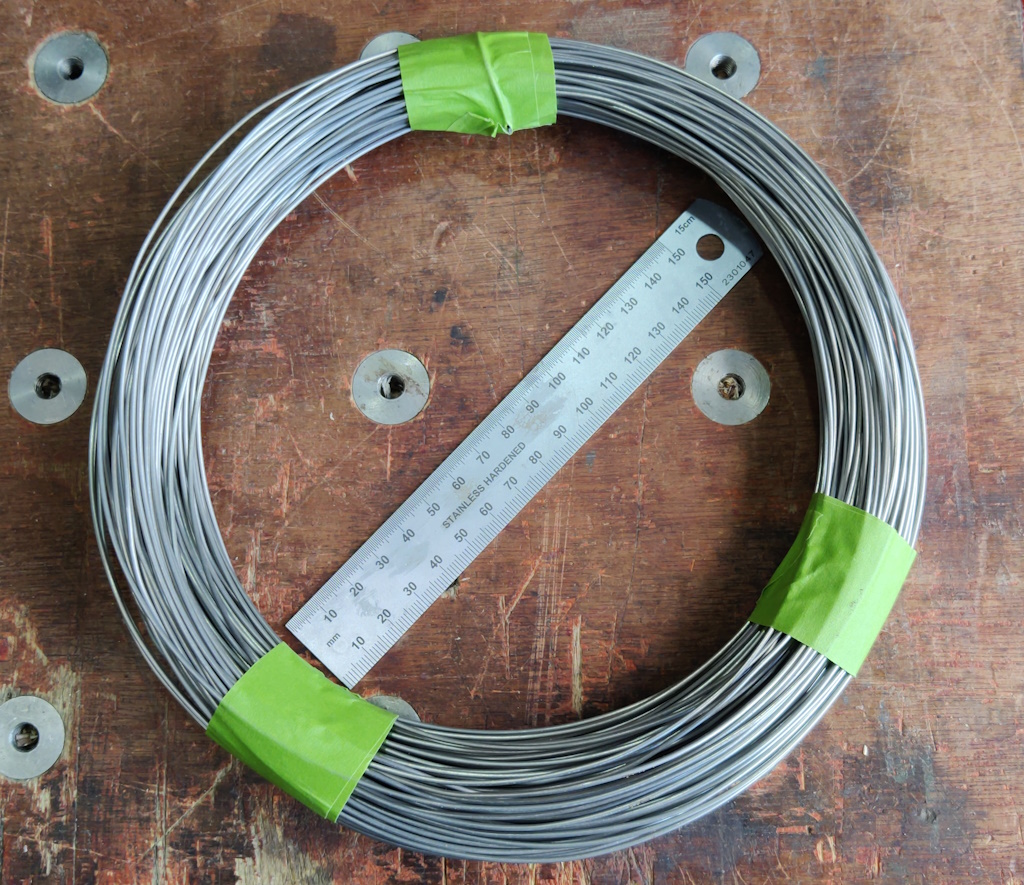
Speaking of ordering stuff, I have now bought the first part of the oven: the Kanthal A1 heating wire. As described in the previous post, I went for 1.4 mm diameter wire. The cavity in the new design is the same size as in the old so the calculations in the previous post should still be valid. Those calculations suggested 27.5 metres of wire. The disadvantage of using the thick wire and hence having a long length is that it might end up being quite a lot of coiled element to fit in the relatively small cavity I've designed - something I'm putting off thinking about for now! I had the choice of 25 metres or 50 metres so erred on the side of caution and bought 50 metres. This is what it looks like as delivered:
I need to form that into a heating element coil for use, but I'll leave that for a while (as it takes up less storage space in a loop than it will when formed into a coil). I can't put it off too long as it could affect the brick design (if there's simply too much to position in the cavity) or force me to use something to reduce the current (e.g. an SCR or a step-down transformer).
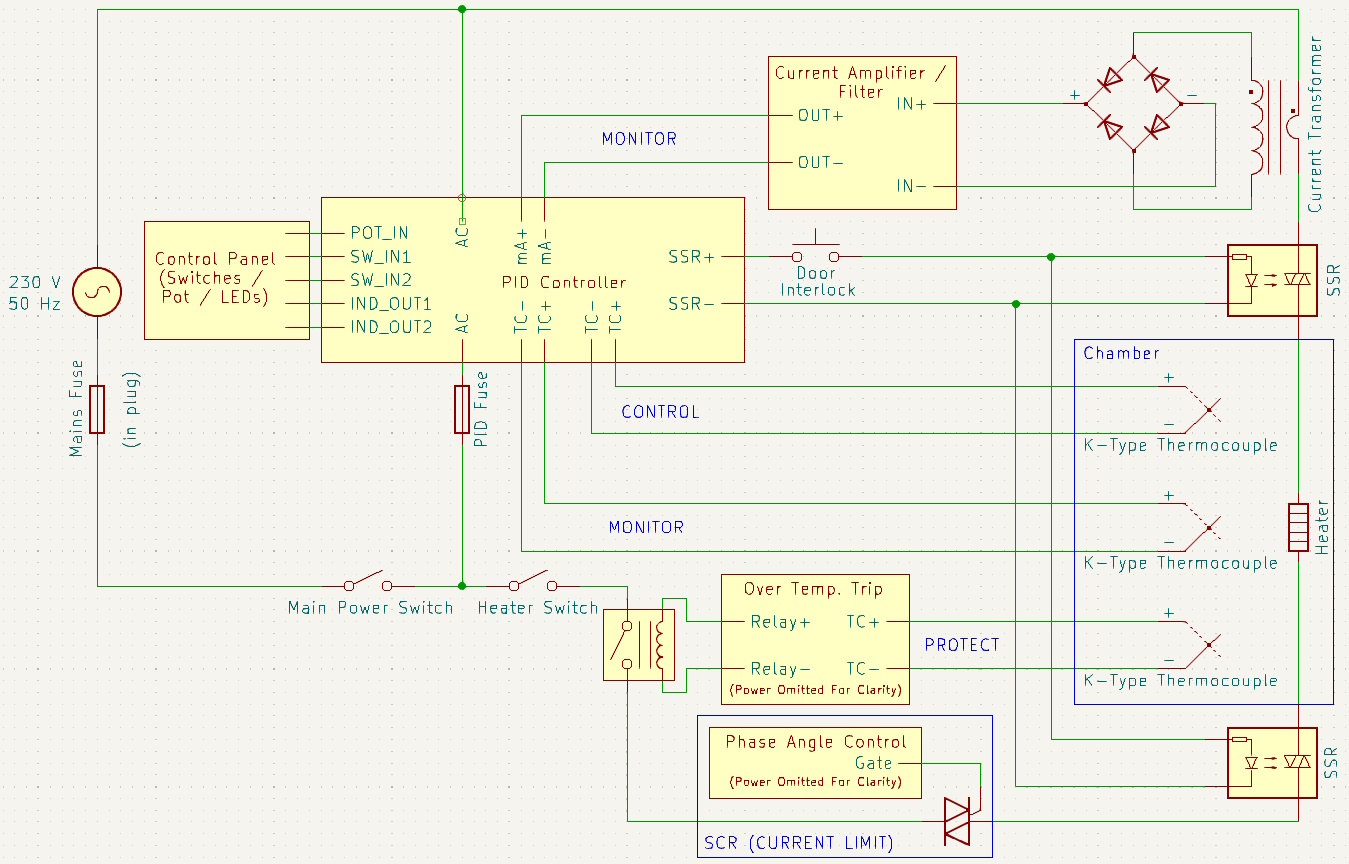
I've had a very kind offer of a very fancy PID controller and some other control gear from a fellow member of the MIG welding forum, so I'm in the process of working out exactly what the control schematic is likely to look like (in a bit more detail than previously described) and also looking at the capabilities of that controller to see if there's anything else that would be interesting to include. The controller manual is 465 pages long so there's quite a bit of reading to do! The controller has multiple inputs and outputs (to allow monitoring various things as well as the SSR control). I've updated the schematic to try to take advantage of some of those features (click for a bigger view):
The idea of the new schematic is that the controller can monitor temperature at two different parts of the oven. It only has one method of controlling the temperature of the oven (via the heater), so it'll probably use one of the thermocouples for temperature control and the other for logging and tracking. I'd wondered about using the second thermocouple input as a safety shut-off, but I think I prefer the idea of having a completely independent (and much simpler) over-temperature shut-down system so I've left that as a third thermocouple.
As the controller has inputs that can be used as current inputs (I'm guessing they're 4–20 mA but I haven't read the manual enough to know) I should also be able to use a third input to monitor heater current (again just for interest) and a fourth one for a potentiometer input (i.e. a control dial). Combined with the various digital inputs and outputs, I think this should allow me to have four different operating modes (with different programs), such as:
- Typical heat cycle for hardening (i.e. heat it up and hold the temperature).
- Typical heat cycle for tempering, possibly with potentiometer based tweaking (i.e. heat it up to a lower temperature and hold it there for a set time, then cool).
- Typical heat cycle for melting brass (similar to #1 but a different temperature).
- Heat up to a temperature set by the control dial.
That might be stretching my ability to program the controller but if it can do all of that (and I can figure out how to make it happen) then it could make for quite an easy-to-use but versatile bit of equipment. Of course there will be nothing stopping me reprogramming the controller to do something completely different if needed.
The disadvantage of all that is the number of parts to design / buy or otherwise get hold of (and then do something with) is getting longer and longer, so I reserve the right to dampen my ambitions a bit!
Page 4 of 35
This website is free and ad-free, but costs me money to run. If you'd like to support this site, please consider making a small donation or sending me a message to let me know what you liked or found useful.

 Return to main project page


