Garden Table Build Process
Page 6 of 38
Posted 28th March 2025
I can't quite believe it's been over 9 months since I last posted anything on this thread. Believe it or not, this project is still high on my list of things to do. Life went rather sideways last year with Carolyn's car crash and that slowed down the progress over the first half of the year (and to some extent over the second half as well) and then I had some other projects (in particular my heat treatment oven) that were best suited to working on them over the winter. With that and a few other bits and bobs here and there, the garden table project has slipped a lot later than I'd hoped.
Nevertheless, I still want to replace our ageing glass-topped garden table with something new and preferably wooden, so I want to get on with this now that I've pretty much finished the salt & pepper mills and have cleared the home-made lathe off the bench. I've got three fairly major projects I'm hoping to complete this year and two of them have fairly firm deadlines (albeit self-imposed ones). One big project needs to be completed by the end of August and the other (somewhat smaller) project needs to be finished by mid-October (but we're away for a sizeable proportion of September so realistically both probably need to be done by the end of August). I'd really like the garden table to be out of the way (both figuratively and literally) by the time I start the next project and that means I need to get on with it as soon as possible.
The (self-imposed) pressure also means I've decided I'm going to further weaken my hand-tool only resolve. If you remember back to the start of the project, I said this was going to be made mostly with hand tools and then (following the other half's car accident and the resulting loss of workshop time) resorted to using the bandsaw for the long rips. I've now decided I'm going to embrace that approach a bit more and use the bandsaw wherever it will give a substantial benefit. I'm also not ruling out using the thicknesser if it'll speed things up enough to be worth it. There will still be lots of hand toolery in the project though: I don't own a surface planer so I have to do that step by hand and I'd rather avoid the screaming monster (electric router) or if I possibly can. I also have no intention of doing any sanding on this project as I hate sanding and prefer the look of a cleanly hand planed surface.
Anyway, well done if you've managed to keep reading this far without getting bored of my waffle.
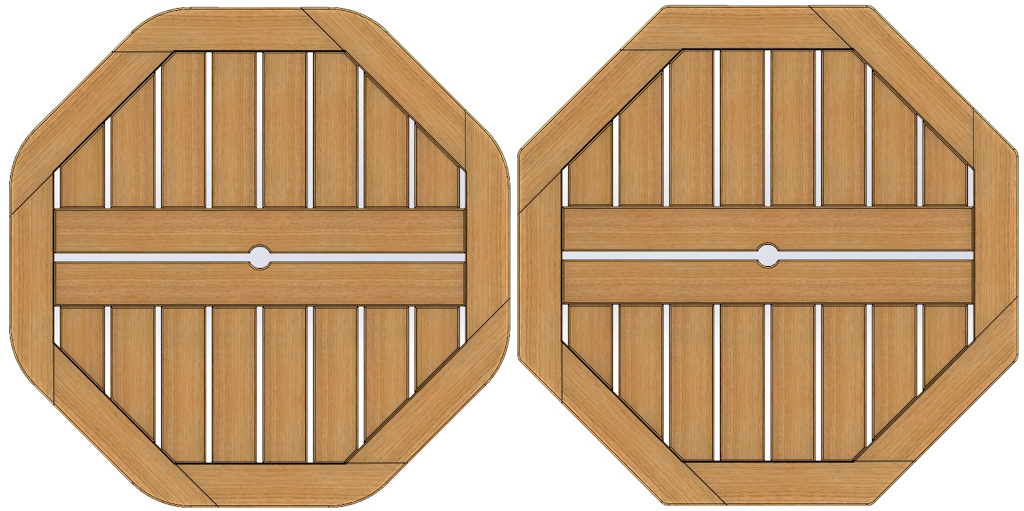
The design has progressed a bit since the last time I last showed it and I'm feeling reasonably pleased with it at the moment (note though, that I have yet to gain approval from the "design authority" so all may change again!). This is what it looks like at the moment in the CAD model:
I'm not completely sold on the rounded corners, hence the two versions of the design, but I'm not going to worry about that for now. Rounding the corners off will be one of the last steps in the table-top build so I can decide on the radius or ditch the rounded off corners completely later. The main thing that's changed since the last CAD model I shared is that I've split the central cross-bar into two pieces. I think that helps with the issue of wood expansion: the cross-bars can expand into the gap between the two of them rather than trying to compress the other slats lengthways.
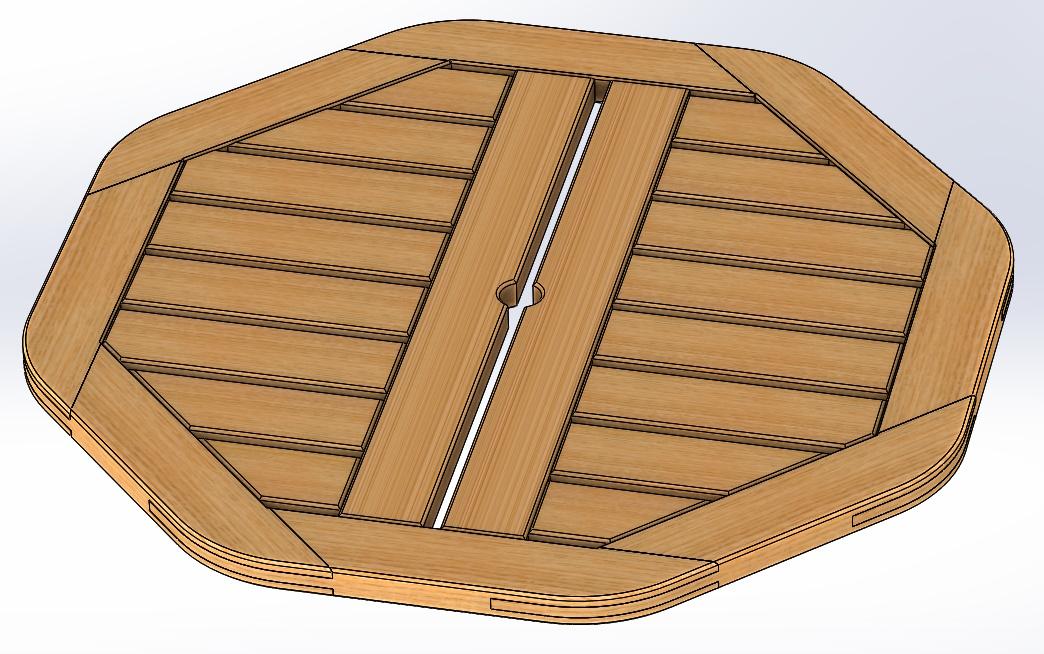
As you can see in this image, I've also taken the (rather brave/stupid in my opinion) decision to use bridle joints rather than half-laps. I've never cut a bridle joint before, so that aspect could be quite challenging! If I'm honest, thinking about that joint was part of the reason I decided to bite the bullet and accept that the bandsaw will be used a lot more than I was initially planning. The rip-cut parts of the bridle joints will probably be much easier with the assistance of a bandsaw and I can put off learning to do it completely by hand until I've got more time. The joints between the main cross-bars, slats and rim pieces are all currently drawn in the CAD as mortice and tenon joints, but I'm quite tempted to do M&Ts just for the cross-bars and half-lap dovetail joints for the shorter slats. The advantage of that is that I can assemble the outer frame and cross bars first, wait for the glue to dry and then mark out and cut the half-lap dovetail joints afterwards. That feels like it'll result in a much less stressful glue-up.
Oh, for a sense of scale, the table top as drawn is 900 mm across flats and 32 mm thick.
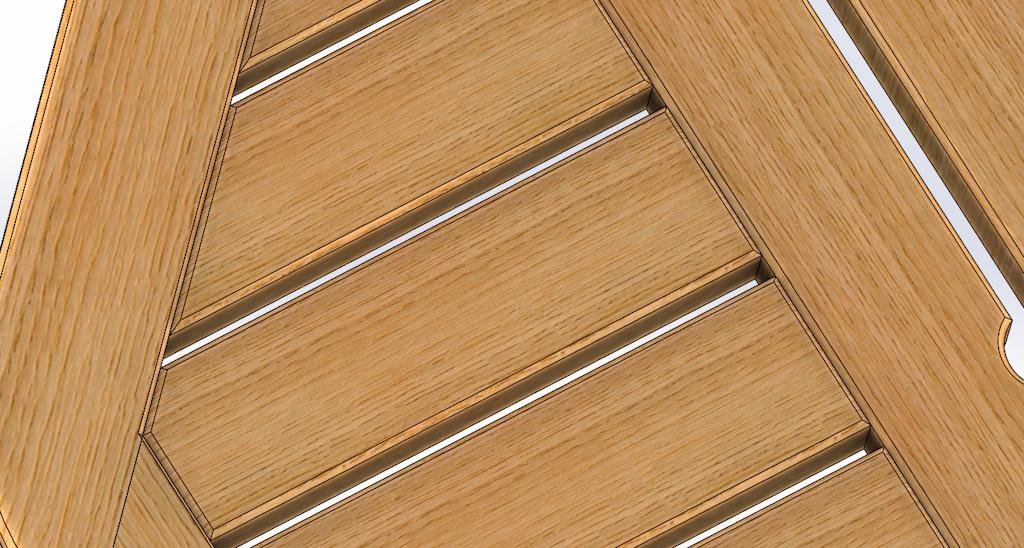
This photo shows a close-up of the slats. I've designed them in the CAD to have a light (3 mm-ish) chamfer around the faces. The advantage of that is that I can much more easily run a plane across the top surface, using the gaps from the chamfer as a starting and stopping point and hence not having to worry about the edge of the plane knocking off a corner somewhere. If I pick the edge board orientation right I might be able to plane all the way around the rim boards in the same direction (clockwise or anticlockwise, but not changing direction from one board to the next). Having said that, I think picking the edge board orientation right might be impossible as a result of the way I chopped up the boards to minimise wastage).
The potential disadvantage of the chamfers around the joints is that it could give water somewhere to sit, which would be far from ideal, so I might yet have to ditch that feature. Comments/thoughts welcome as usual.
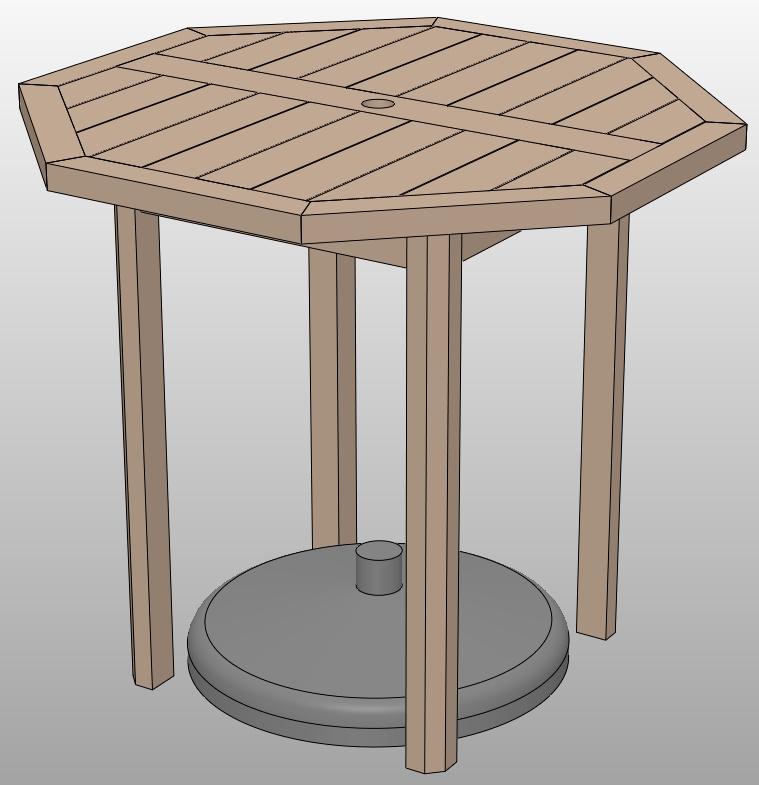
I've still got to figure out the base of the table. At the moment I'm still leaning towards a very simple and fairly conventional table base construction, with four legs and some rails between them (probably with mortice and tenon joints into the legs and buttons attaching the table top). That would make it look something like this very old (and out of date) CAD model:
I have no plans for the table to be put away for the winter (I don't have anywhere to put it!) so there's no point trying to make it collapsible. The main issue I see with the simple legs-and-rails approach is that the top of the rails might look a little odd when viewed through the gaps between the slats in the table top. I don't have any better ideas at the moment though!
Comments on any of the above would be very welcome.
Page 6 of 38
This website is free and ad-free, but costs me money to run. If you'd like to support this site, please consider making a small donation or sending me a message to let me know what you liked or found useful.

 Return to main project page


