
Nodus Draw: Getting started
Starting Nodus Draw
Nodus Draw runs in your web browser: visit https://nodus.cgtk.co.uk. There is nothing to install, no account to make and nothing is uploaded. Drawings are opened from and saved to your own computer.
A current desktop browser is needed. Chrome, Edge, Vivaldi and the other Chromium-based browsers are best: with them, File › Save writes straight back to the file you opened. Firefox and Safari work too, but saving downloads a new copy of the file each time.
Nodus Draw is made for a computer with a mouse and keyboard. On a phone or tablet you can look at, save and export drawings, but drawing is fiddly.
Installing it (optional)
In Chrome and some other browsers on a computer, the address bar offers to install Nodus Draw. Installed, it opens in its own window with its own icon, like any other application, and your computer offers it in Open with for the kinds of drawing it reads, such as SVG, CorelDRAW and Visio files, and for pictures (PNG, JPEG and others) to edit.

I strongly recommend you use Chrome for this (even if it isn't your usual browser). If you can't do so, Edge works okay. Other browsers (Vivaldi, Safari, Firefox) offer fewer features or don't work at all.
Installed or not, once Nodus Draw has been opened it works without a network connection. A new version is picked up the next time you open or reload it.
The window
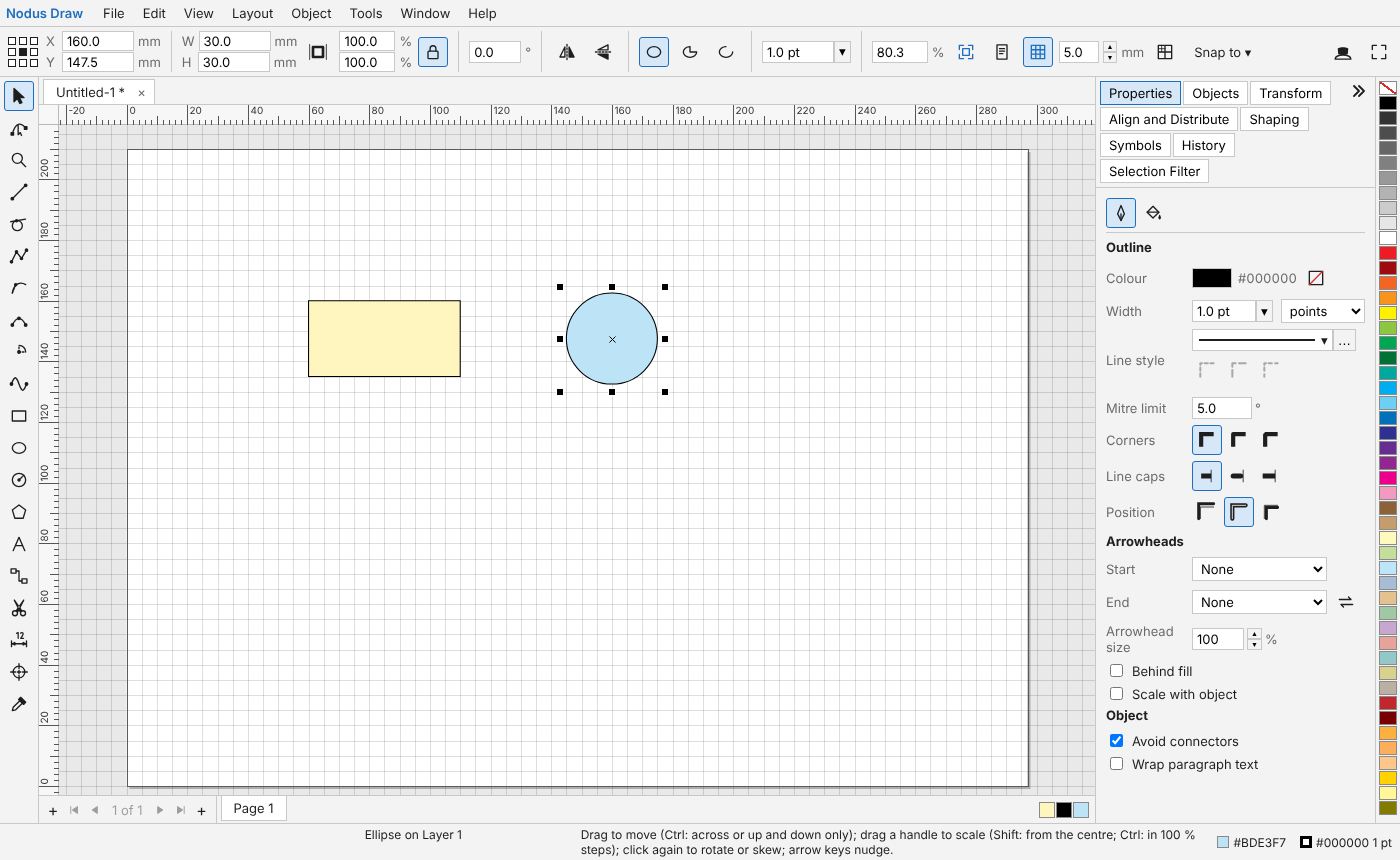
- Menu bar along the top: File, Edit, View, Layout, Object, Tools, Window and Help.
- Property bar below it: settings for the tool in hand or the objects selected, such as their position and size, or a text's font. With nothing selected it has the page's size and the document's settings. Its right-hand end always has the grid and snapping settings.
- Toolbox down the left: the drawing and editing tools. Hover over one to see its name and its key.
- Drawing window in the middle, with rulers along its top and left, a tab for each open drawing above it and a tab for each page below it.
- Dockers on the right, each on its own tab: Properties (outline, fill and text), Objects (layers and the objects on them), Transform, Align and Distribute, Shaping, Symbols, History and Selection Filter. The button at the end of their tabs hides them all to give the drawing more room.
- Colour palette down the right-hand edge, and the document colours (the colours used on the page) along the bottom.
- Status bar along the bottom: the pointer's position (and where it would snap to), how to use the tool in hand, and the selected objects' fill and outline.
The status bar's hints change as you work, and say what the modifier keys (Shift, Ctrl, Alt) do at that moment. Help › Keyboard Shortcuts lists every key (see Keyboard).
When Nodus Draw starts, a welcome window says a little about it. Tick Do not show again to stop it appearing; Help › Welcome Screen shows it again.
Nodus Draw is free and without adverts. Now and then (every 20 times it starts) it asks whether you would like to support it with a donation or a message; tick Don't ask me again if you would rather it did not. Help › Donate and Help › Contact Dr Al are there at any time.
Moving round the drawing
| To | Do this |
|---|---|
| Zoom in or out about the pointer | Turn the mouse wheel |
| Pan | Drag with the middle mouse button, or hold Space and drag |
| Scroll left and right | Ctrl + wheel (or Shift + wheel) |
| Scroll up and down | Alt + wheel |
| Zoom in or out about the middle | + and - (F3 also zooms out) |
| See everything on the page | F4 (zoom to fit) |
| See the whole page | Shift+F4, or Home with nothing selected |
| See the selected objects | F5 (or Shift+F2) |
| Full screen | F11 |
In full screen, the browser leaves full screen while it shows a window for choosing a file (to open, save or export). Nodus Draw goes back to full screen afterwards, or, where the browser wants a click first, shows a Back to Full Screen button at the top.
While you drag something (an object, a node, a marquee), taking the pointer past the edge of the drawing window scrolls the drawing that way, faster the further past it you go. The zoom tool in the toolbox zooms in where you click, out with Shift+click or a right-click, and to fit a rectangle you drag. A 3Dconnexion 3D mouse can pan and zoom too (Tools › 3D Mouse Support; see 3D mouse).
A first drawing
- Press R (or click the rectangle tool) and drag on the page to draw a rectangle. It stays selected.
- Click a colour in the palette on the right to fill it. A right-click on a colour sets its outline colour instead.
- Press T for the text tool and click just inside the rectangle's edge: the text you type goes inside the rectangle, centred, and wraps to fit. Press Escape when you have finished typing.
- Press Space to switch to the pick tool. Drag the rectangle to move it (its text goes with it), or drag the handles round it to resize it.
- Press Ctrl+S to save. Drawings are saved as SVG files, which other programs (web browsers, Inkscape, CorelDRAW) can open too, with everything Nodus Draw needs kept inside them. See Files.
Every change can be undone with Ctrl+Z and redone with Ctrl+Shift+Z (or Ctrl+Y). Nodus Draw never forgets a change: Edit › Undo History shows all of them, including ones you undid and then went a different way from (see Undo and history).
Unsaved drawings are kept in the browser as you work, so if the browser or the computer crashes, Nodus Draw offers them back when it next starts.
Tools and keys
Many things in Nodus Draw can be done with the keyboard (Help › Keyboard shortcuts lists every key). A few things are worth knowing:
- Most tools have a letter key (R for rectangle, L for a line, T for text and so on): press it with nothing selected. With something selected, some letters act on the selection instead (R turns it, C and E line up its centres), so press Escape first to deselect it.
- Space, tapped, switches between the tool in hand and the pick tool. Escape abandons what is being drawn, or deselects; with nothing selected it switches to the pick tool.
- Angles are measured clockwise, from the right.
- Redo is Ctrl+Shift+Z or Ctrl+Y.
Positions and units
Sizes and positions are in millimetres. Positions are measured from the bottom-left corner of the page, with y increasing upwards. To measure from somewhere else, drag from the corner where the rulers meet to the point you want (double-click that corner to put it back); see Precision.
This website is free and ad-free, but costs me money to run. If you'd like to support this site, please consider making a small donation or sending me a message to let me know what you liked or found useful.