
Nodus Draw: Outlines and fills
Every shape has an outline (its line) and a fill (the inside). Lines that are not closed have only an outline.
The colour palette
The palette down the right-hand edge of the window is the quickest way to colour things:
- Left-click a colour to fill the selected objects with it.
- Right-click a colour to give them that outline colour.
- The first swatch, crossed out, means no fill (left-click) or no outline (right-click).
Hover over a colour for its name. With the text tool, a left-click colours text instead: the text being typed, the selected text, or (with nothing selected) the text you type next.
The document colours strip along the bottom of the window lists the colours used on the page and works the same way, so the same colour is easy to use again.
The colour eyedropper tool picks up a colour from anything on the drawing; Shift+click then gives that colour to an object (see Drawing).
The Properties docker
The Properties docker (also Object › Properties, or Properties on the right-click menu) has an Outline tab and a Fill tab, and for text more tabs (see Text). Changes apply to every selected object, including objects inside selected groups; where they differ, the fields are left blank.
With nothing selected, the docker sets the default style: the outline and fill that new objects are drawn with. A note at the top of the docker says so. The palette does the same.
Outline
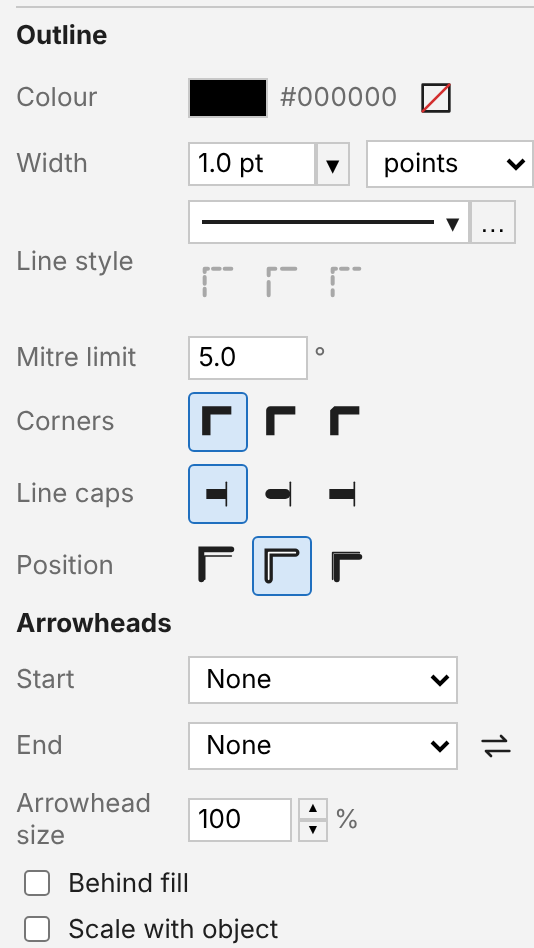
- Colour, and a No outline button.
- Width: choose from the list or type a width, in points or millimetres (the menu beside it chooses which; type "pt" or "mm" after a number for either). Hairline is the thinnest line (0.216 pt). The same width field is on the property bar.
- Line style: solid, or one of the dot and dash patterns. The "…" button opens Edit line style: click squares to make your own pattern (each is one outline width long), then Add it to the drawing's list of styles. Three buttons adjust the dashes: no adjustments (the pattern as it is), align dashes (stretched so that each straight run starts and ends with a dash) and fixed dashes (a whole dash at each corner and end).
- Corners: mitred (pointed), round or bevelled. The mitre limit stops very sharp mitred corners sticking out: a corner sharper than that angle is cut off square.
- Line caps: square (stopping at the end), round, or extended square.
- Position: outside the shape's edge, centred on it, or inside it. A rectangle 50 mm wide with a 2 mm outline outside is 54 mm wide overall.
- Behind fill draws the outline behind the fill, so only its outer half shows.
- Scale with object makes the outline thicker or thinner as the object is resized. Otherwise it keeps its width.
Arrowheads
For lines (and the open ends of curves): a Start and an End arrowhead, from triangle, rounded triangle, open arrow, diamond, dot, square and bar, and the line ends used by dimensions (a bar across the end, with or without an arrow pointing into it). The swap button exchanges them.
Arrowheads are drawn in the outline's colour and grow with its width; Arrowhead size makes them bigger or smaller than that. The point of an arrow is exactly on the end of the line, so a line drawn to a point ends there.
Which end is the start depends on the direction the line was drawn: the shape tool shows it with small triangles at the ends, and its Reverse direction button swaps them.
Fill
- No fill, a uniform fill of one colour, or a fountain fill: a blend from a Start colour to an End colour, optionally through a Middle colour.
- The fountain's Angle is its direction (0° from left to right, 90° from top to bottom). The Balance slider says where the blend is half done; with a middle colour, three sliders say where the middle colour is and how each half blends.
- The blend runs across the object's box, and turns and stretches with the object.
Choosing a colour
Click a Colour swatch on either tab to open the colour picker across the docker. Its three buttons choose a picker (a square of shades and a strip of hues), sliders for each component, or palettes of colours; the drop-down beside them chooses the colour model: RGB, HSV (hue, saturation and value: handy for making a colour lighter or darker without changing it otherwise) or CMYK. The picker and sliders have number fields to type values in, and the hex code for RGB and HSV. Under them the colour's values are shown in CMYK, RGB, HSV, Lab and hex. The colour shows on the objects as you drag, and becomes one undo step when you let go.
Colours are kept as RGB. CMYK values are converted simply, without a colour profile, so they may differ a little from other programs'.
In the status bar
The right-hand end of the status bar shows the fill and outline (colour and width) of the selected objects.
This website is free and ad-free, but costs me money to run. If you'd like to support this site, please consider making a small donation or sending me a message to let me know what you liked or found useful.