
Nodus Draw: Precision
Nodus Draw is for drawings where things have to line up: points snap to the grid, to guidelines and to other objects, and positions and sizes can be typed in millimetres.
Positions
Positions are in millimetres, measured from the bottom-left corner of the page, with y increasing upwards. Angles are measured clockwise from the right.
The status bar's left-hand end shows where the pointer is, and where it
would snap to, if anywhere: 90.76, 114.20 mm → 90.00, 115.00 mm.
The grid
Show grid (on the property bar's right-hand end, or View › Show grid) shows the grid; the field beside it is its spacing. Its ▲ and ▼ buttons (and the ↑ and ↓ keys in the field) double and halve the spacing, so that something can be put halfway between grid lines and the grid then put back.
- G halves the grid spacing for the moment, and G again goes back to the drawing's own spacing. It works in the middle of drawing something, so a single point can go between grid lines. While it is halved the spacing field is highlighted, and saving keeps the drawing's own spacing.
- Shift+G turns showing the grid and snapping to it on together, or both off if both were on.
The grid starts at the origin, so moving the origin (below) moves the grid with it.
Snapping
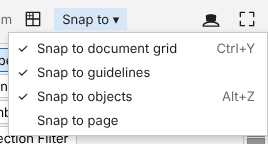
The Snap to menu at the right of the property bar (also on the View menu) chooses what points snap to:
- Snap to document grid;
- Snap to guidelines;
- Snap to objects (Alt+Z): their nodes, the points where they cross, their centres (and the centre of a circle or arc), the middles of their segments, and, failing those, the nearest point on an edge;
- Snap to page: its corners, the middles of its sides and its centre.
Objects and guidelines are snapped to unless you turn them off; the grid is not. Which are on is shown without opening the menu: Show grid is coloured while snapping to the grid is on, Zoom to page while snapping to the page is, and Zoom to fit while snapping to objects is; guidelines are drawn dashed while they are not snapped to. These settings belong to the browser rather than the drawing.
To place something freely, without snapping at all: hold Alt while you drag, or press the Snapping off button beside the Snap to menu (it has no key, so it is not pressed by mistake). Press it again and snapping comes back as you had chosen it.
While you draw a line, two more points count: where the line would meet another perpendicularly, and where it would touch a circle or curve as a tangent.
With the grid on, the grid's crossings, and the places where an edge crosses a grid line, count as points, so you can snap to where a circle crosses a grid line.
A marker and a label show what the pointer has snapped to: a square for a node, × for a crossing, a circled cross for a centre, a triangle for a midpoint, a right-angle mark for perpendicular, a circle and line for a tangent, a diamond for an edge and a cross for the grid or page.
What snaps:
- Drawing tools snap every point they place.
- The pick tool snaps the point the selection is held by: a node, the middle of a segment, a corner or the centre of the selection's box, or the centre of several objects together, if the pointer is near one when you press; otherwise the point you pressed. Hover to see which. The scaling handles snap the corner or side they move.
- The shape tool snaps the node or handle being dragged.
Rulers and the origin
The rulers along the top and left show millimetres and mark where the pointer is. View › Show rulers (Alt+Shift+R) hides and shows them.
To measure from somewhere other than the page's bottom-left corner, drag from the corner where the rulers meet onto the page: the origin (0, 0) goes where you let go, snapping as any point does (the page's corners come first). The grid moves with it. Double-click the corner to put the origin back at the bottom-left of the page. Each page has its own origin, saved with the drawing.
Drawings made in Inkscape open with the origin at the top-left corner, where Inkscape's grid starts, so that what was drawn on its grid is on Nodus Draw's.
Drawing to scale
To draw something bigger or smaller than the page, give the page a drawing scale: the scale field on the property bar, beside the page size (with nothing selected). Choose one from its list or type it, either way round, as on technical drawings. At 1:4, one millimetre on the page stands for four in the drawing, so an A4 page shows as 840 × 1188 mm, and a rectangle drawn 600 × 500 mm on the rulers is 150 × 125 mm on the paper. At 4:1, the drawing is four times bigger on the page than it really is, for small parts. The rulers, positions, sizes, the grid spacing and dimensions all show the drawing's millimetres, so you can draw a room or a machine at its real size.
Line widths stay as they are on the paper, and so do text sizes in points (a size in millimetres is the drawing's, so 3.5 mm text on the paper shows as 14 mm at 1:4). Each page has its own scale, saved with the drawing; the "All pages" and "Current page" buttons beside the page size choose which pages it applies to. Exported as DXF, for CAD programs, a page drawn to scale is in the drawing's millimetres.
Guidelines
Drag from the top ruler for a horizontal guideline, or from the left ruler for a vertical one, and let go over the drawing. Guidelines snap as they are placed, run right across the window, and are saved with their page.
With the pick tool, click a guideline (away from any object over it) to select it, then drag it to move it, or press Delete to remove it. Dragging it back onto its ruler removes it too.
Typing values
Anything can be put exactly where it should be by typing:
- the property bar's X, Y, W and H for the selection, with the reference point choosing which of its points X and Y refer to;
- the Transform docker, to move, turn, scale, size or skew by a given amount, and make copies as it does (see Selecting and arranging);
- the Align and Distribute docker, to line objects up with one another, the page, the grid or a point.
This website is free and ad-free, but costs me money to run. If you'd like to support this site, please consider making a small donation or sending me a message to let me know what you liked or found useful.